Why should I do this?
Why should I do this?
The days of going to a store and buying a Windows installation CD are a thing of the past. If you search for it, you can find buyable USB sticks to install an OS but you can also simply create them and learn something along the way.
Prerequisites
1. You need an USB stick
I experienced a lot of issues with cheap sticks of no-name brands (offers like 10 sticks for 30€) so I stick to SanDisk, Kingston or Intenso.
2. You need an ISO
ISO is short for “Optical Disc Image”. For our use case think of the ISO file as a downloadable file containing everything you need to install the operating system (OS) it was made of/for. Think: operating system ISO = OS image. Depending on the OS you want to try out, you should refer to the official documentation. Some distributions recommend programs that aid you in writing the ISO to a stick (= flash the ISO), but you can also do it via the terminal. The following table shows some official sites plus their recommendations for programs that help you flash an ISO to SD cards/USB drives.
| Operating System | Recommended Program(s) | Official Guide | ISO Download |
|---|---|---|---|
| Ubuntu | balenaEtcher: works on Windows, MacOS & LinuxRufus: Windows only | Ubuntu Guide | Ubuntu Download |
| Debian | Officially: win32diskimagerI used to use Rufus but balenaEtcher made a good first impression | Debian General Guide Debian Guide Write USB | Debian Download |
| Arch Linux | In the wiki, a lot of different options are explained ranging from 3rd party programs with a GUI to terminal tools like Cygwin or the manual approach with command line utilities which are part of Arch’s coreutils | Arch Linux Guide | Arch Linux Download |
| Linux Mint | USB Image Writer | Linux Mint Guide | Linux Mint Download |
Flash the USB
3. Use a program to flash your USB
The programs mentioned above have their own tutorials/guides. Check them out! :)
4. Create a bootable stick manually using coreutils
Host OS: Linux ISO: Arch Linux
4a.) Download the latest ISO
international: https://archlinux.org/download/ -> in case of doubt, use the Worldwide mirror http://geo.mirror.pkgbuild.com and select the x86_64.iso
German: https://www.archlinux.de/download -> use the handy download button
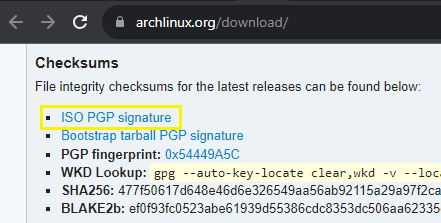
4b.) Obtain data to verify the ISO
In the case of Arch Linux you can find the relevant information (PGP key download, sha256 sum) directly on the download page. Other distributions have the information located somewhere else. Check the list below to find your guide/checksum for the ISO you chose.
- Ubuntu -> https://ubuntu.com/tutorials/how-to-verify-ubuntu#1-overview
- Debian -> https://www.debian.org/releases/bullseye/amd64/ch04s07.en.html
- Linux Mint -> https://linuxmint-installation-guide.readthedocs.io/en/latest/verify.html
4c.) Verifiy the ISO
Why? With this check you ensure that the file you downloaded is an exact copy of what is present at the official download servers. If this check fails this can mean that the file is damaged which could result in random issues during the installation. It can also mean that you somehow ended up with a file not being the official file of the developers but of someone else, which in the worst case is a modified or malignant copy.
SHA256 Checksum SHA-256 is a cryptographic hash function. If applied to a file, the algorithm outputs a unique hash value - the checksum of the file. This checksum - a string - can be used to verify the integrity of a file.
First, generate the sha256 sum of the ISO:
sha256sum archlinux-2023.11.01-x86_64.iso
This command will output a long string of characters and the ISO file’s name behind that long string.
477f50617d648e46d6e326549aa56ab92115a29a97f2ca364e944cea06970608 archlinux-2023.11.01-x86_64.iso
Compare your output to the sha256 sum on the official website. If they are identical, the downloaded ISO file has not been modified.
GPG/PGP Signature Note: you need the package extra/sequoia-sq
sudo pacman -Syu sequoia-sq
Both GPG and PGP are cryptocraphic software that can be used to sign (and verify) files. The publisher/developer of the file signs it using their private key. The public key can be used by and enduser to verify the signature.
Download the signature by clicking on the link at the official download page.
You will find a .sig file in your downloads folder or the location you specified. For the later verification it is best to have the ISO file and the .sig file in the same directory.
Download the release signing key with WKD:
sq wkd get pierre@archlinux.org -o release-key.pgp
Verify the signature:
sq verify --signer-file release-key.pgp --detached archlinux-2023.11.01-x86_64.iso.sig archlinux-2023.11.01-x86_64.iso
If the signature is valid, the ISO is authentic and can be used safely.

4d.) Write ISO to USB Flash Drive using dd
Find out the name of the USB flash drive:
ls -l /dev/disk/by-id/usb-*
If your drive is recognized by the system, you should see an output like the following:
![]()
If you already setup a bootable USB flash drive, the output looks like below. In that case, you can use that stick directly.

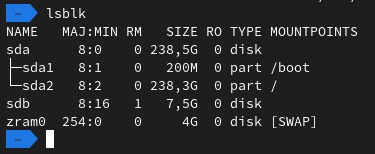
Check that the drive is not mounted:
lsblk
The output of lsblk shows the block devices recognized by your system. Recognized is not mounted. The column MOUNTPOINTS gives info if the drive is mounted or not. Something being “mounted” means it is attached to the file system hierarchy, that starts with a forward slash. If you do not see mountpoints for your drive, it is not mounted as in the example below.
write the ISO to the stick using dd:
I simply cd into the directory where I saved the iso. If you are elsewhere, if (= in-file) takes the path to the ISO file. Also you have autocompletion on tab in your terminal which prevents typos in the values you set at in file and out-file (of).
sudo dd bs=4M if=archlinux-version-x86_64.iso of=/dev/disk/by-id/usb-My_flash_drive conv=fsync oflag=direct status=progress